About Me

My photo
Jack of All Trades, Master of None. I have never met a hobby that I didn't fall in love with. But for now my focus lies mainly with pottery and with needle felting.

Friday, December 24, 2010

Fatal Attractions

I guess it was bound to happen sometime...well, maybe not. But it will guarantee it never happens again.

I'm not sure if it was coincidence, or a direct result of, or just a bad omen. But last night while firing the kiln, we heard something ceramic fall to the floor. My hubby asked if something blew up in the kiln if we would hear it. I replied that Yes, we would, but it would be more of a "pop" sound WITHIN the kiln, not something dropping to the floor.

Turns out it was just one of the peep-hole plugs. So I stuck it back in, and felt very relieved, mostly. But part of me was still a tad worried about things....

Last evening we were watching a show on television called "Fatal Attractions". It featured various people who fell in love with wild large cats, such as lions or tigers, and kept them as pets, and eventually the cat either killed them, someone else, or had to be put down due to its wild nature not fitting in with the context it was living in. In many of the cases, the owner of the animal made just one mistake...but that mistake was all it took for a devastating outcome.

Turns out I was playing with fire as well. Lately I've been pushing the limits as to how thick things are that I make and decide not to carve out. I've heard an inch is a good rule of thumb. So the other night, I made about 10 little creatures about an inch thick that I planned on firing the next day if I could get them dry enough. (Mistake number one....) My daughter also happened to make a thick Christmas tree, which I really SHOULD have carved out, but due to the fact that I was very tired (I stayed up late for other last minute projects), and I had fired other stuff some-what thick, I took a risk.

It's a risk I'll never take again. I woke up, opened up the kiln, and discovered some wayward pieces of bisque-looking chunks on the top shelve where I had my glazed objects. I could figure out where they came from until I glanced down to the bottom of the kiln and saw several more fragments scattered about, and then it hit me - I finally crossed the line and blew something (or things) up in my kiln.

The tree didn't survive, nor did 4 out of my 10 little creatures. On top of that, a Christmas gift I intended didn't quite turn out as I had hoped, so I'll have to think of a way to fix that, as well.

Overall, I know it's not a huge deal. But it could have been prevented. How many times have I mentioned that you must carve out your clay? How many times have I carved out something I didn't want to because I was tired and ready to be done with clay for the day? And yet here I am. I took a chance, and I learned my lesson. No more playing with the limits in this regard again...

Monday, December 13, 2010

New Items For Sale!

I did a high-firing this weekend, with some Christmas gifts and a few Etsy items. I also did a bisque/glaze firing and experimented with some pendants. They aren't real fancy, yet, but it's a step in trying something new.

Here is the couple I was working on...I really do love this one - just like the couple in labor that I did. It's not real detailed or anything, but the FEELING really comes across for me.

I'm excited that I've gotten a few sales this month due to the holiday season. It does wonders to boost my self-esteem and urge me on to try new things, make mistakes, and get my hands dirty! I never truly give up hope, but there have been days, this past year especially, that I am too fearful to make anything at all, simply because I might fail. But with each sale, I have a source of energy and encouragement that overcomes those dark, negative thoughts. And for this, I am thankful. Even more so than for the money. The money helps pay for my clay. The affirmation keeps my drive well and thriving.

Friday, December 3, 2010

Sneak Peak!


My latest creation in the works...

What goes into a Smoke Firing?

I've been working this week on some sculptures that I intended to smoke fire, so I figured I'd show you what exactly goes into a smoke firing that makes it so special...
The first step after creating the piece is to burnish it. There are many different ways to do this, but I use a smooth rock that I found in the local creek, and burnish the clay just before it is dry, but after it is leatherhard. Here is an example of a burnished piece compared to a yet-to-be burnished piece. You can see the visible shine and smoothness of the piece on the left:

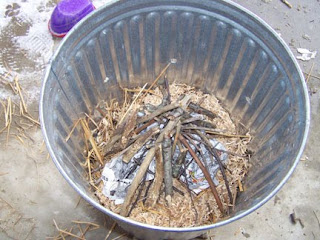
After they are fired to a low bisque temperature (cone 010 because it's what the pottery supply store had on hand in cones), I take them outdoors for the REAL fun!This time I decided to try my new trash can which I've punched holes into. Usually I use old popcorn or Christmas tins that are much smaller, but since I have five items and I DID take the time to punch all the holes in the trash can, I'll try something new.


In this case I've taken straw, salt, baking soda, coffee grounds, and miracle grow (hopefully for color) and placed it in the bottom of the can, then the pieces I'll be firing, and then more straw with colorants. Then I light it on fire, and shortly thereafter I smother it.
.

It smokes for a while, but not very long. I need to learn how to get better results in color by letting it burn longer, but I never seen to be able to control what the fire does or how much it colors the pieces.

After it cools down, I remove the lid, and there are my pieces! Already you can see the variants of color the smoke has left.


After I scrub the ashes and char off the sculptures, I lightly buff them with some bee's wax/olive oil mix, to help bring out the color a bit more.


This type of firing method is very similar to how the ancients fired their pots and art, and I hope to keep experimenting with it!

Friday, November 26, 2010

Holiday Sale!

Holiday Sale!

Before I get to the (hopefully) resolution of my element dilemma, I wanted to share that from Black Friday through Cyber Monday, you can get 10% off anything in my Etsy shop! Just use the coupon code Turkey10 during checkout!

Okay, on to business. So in lieu of spending $60 per element, when I know that my other elements will probably be failing soon, as well, my wonderful (and handy) hubby and I learned how to heat, twist, and connect pieces of my existing elements together to create a (for now) working element. It took a few hours longer than I had wanted, but in the end, if it saves me $240 for a little while, then it'll work for now.

Eventually (maybe in the summer?) I'd like to convert the kiln to gas, which will not only save money in the long haul, but will allow for experiments in reduction firing, raku, and possibly soda/salt firings.

I also have narrowed down some ideas for both my shop, as well as the medieval faire, so now all I need is some free time - HA!

Always Something New


EDIT: This post was originally meant to go up November 7...however, I accidently posted it on my personal blog instead. So here it is, albeit a bit late.


I know it's been awhile, AGAIN, since I last blogged. But for the sake of excuses, I'd rather have something TO blog about, than to chat on about nothing in particular.

I promised pictures of my next idea - I've got something even better - the finished product! Here are some recent pieces I'll be adding to Etsy soon:


These are two pregnant women in yoga-like poses, gazing down at their blossoming bellies.


Another two pregnant bellies, this time with just the torso and a hint of appendixes. Both glazed, one clear, the other a Blue Rutile, though I was disappointed that no blue showed up.


Two more bellies with carved designs and smoke fired. The profile of the tree of life one is below:

This is an idea I'd like to expand on - women in labor.


And here are some necklaces that I played around with:


The mothers above are my original designs of attachment parenting concepts.
And lastly, I promise to try to get past my fear of screwing up and start getting my hands messy more often. I have a ton of ideas brewing in my head, none of which are even remotely close to the ideas in this post. Some are great for the ren faire, and some I'm hoping are great for anytime. But the point is, I won't know until I try. So try, I will.

This last picture is of my colored porcelain (mixed with mason stains) soaking in water to become slip. I really want to try sgraffito and other slip methods with these. So here's to not giving up. See you very soon!

Monday, November 15, 2010

It's Elements, My Dear Watson...

So that time has come. The moment I've heard about, read about, feared about. An element has failed me, finally.

I noticed it when I tried to turn on my kiln for the last firing, and did not hear the normal "humming" sound that indicates the elements are warming up. So I flipped the switch back and forth a couple times, tried the other switches, which DID hum, and finally gave up and fired without my lowest element. Luckily it was just a bisque firing so I knew it would reach temp okay, as long as no other elements decided to kick the bucket, as well.

So today I got brave and decided to make sure it was the element, and not the switch, by checking the continuance of the element with an ohmmeter. It was definitely the element. Checked online for prices for a replacement, and even considered buying enough to replace all of them at the same time. HA! $60 a pop, at 4 elements...almost as much as I paid for the kiln originally.

So, I did the next best thing, and decided to take out the element of the extension for my kiln, which I've never used, yet, and save myself money for the time being. But a stubborn, rusty screw, and one last snap of the wire, and now I have a too-short element. I tried warming it to twist it with another piece, but keep breaking it, instead. So I'm waiting until my hubby can take a gander at it and make it (hopefully) work. I'll also see about splicing some of my other elements as there is at least one other very dark spot that is likely to go bad soon, as well.

It's days like these that I wish I had fallen in love with a much less expensive hobby.

Tuesday, July 6, 2010

The Mother-Load

A few weeks ago I took my second expedition down the creek to the location of the clay. I had my parents there to help me carry back another 100 lbs. of clay, which still wasn't easy despite the wagon we used to cart the goods home. At some point in the future I will ask the landowner opposite the clay if we can drive closer to the actual point of the site so that we don't have to carry it several feet through the creek and then up the bank...Anyway, I took pictures to demonstrate how this particular clay looks in a creek and then the large deposit I'm actually mining. Plus some pics of the kids and grandpa swimming ;)First is a glimpse of what I noticed that first day - the small white "stone" in the creek. Notice that initially there's nothing that shouts out "CLAY!"


Next you'll notice a larger chunk of clay, and then a very large streak on the creek bottom. We're getting closer!


And here's the Mother-Load!!! You can see in the creek bank where the clay ends, both on land and in the water.


Here is a second spot just a few feet up stream from the first. You can see how it has been either dug out by other people (some used it for horseshoe pits, others for firing, some for "war paint", etc.) or else the creek is actually carrying it away. I hope it's the former - I'd hate to see all this disappear.


Some fun while we're at it :)


Here's what appears to be a small piece of clay, but once it's dug out of the creek, you'll see that it was just a hidden "iceberg" poking out.

So there you have it - Finding Your Own Native Clay 1o1!

Next time I post I'll have pics of my newest ideas - if I ever find time to work on them! Between vacations, cooling off in the water and visiting with friends, it's hard to actually find time to sit down and create. But I have a ton of ideas I'm dying to toy around with!


Thursday, June 10, 2010

Surprise in the Kiln!


Okay, so most of the time I don't want surprises in the kiln. Not at this stage in the game. One, it was a bisque load, so pretty predictable. But second, until I'm mixing my own glazes and experimenting, most of the work I do I do with an expected outcome, and when it doesn't happen, I'm usually disappointed, not excited.

HOWEVER, today is an exception! I put a small test chunk of the creak-bed-clay into the kiln to see how it holds up to cone 03. Not only did it hold up, but here's how it turned out:


In case you can't tell, it's the red piece of clay (well, brown, but "red" as far as clays usually go) against the gray clay behind it, which is the unfired creak-clay. The gray clay doesn't fire white, as I thought it would, it fires red! I can't believe it! I've never used "terra-cotta" clay before! I'm not sure exactly what kind of clay it is, but the red has a few advantages. One, in smoke firings, red often has pretty cool results. Two, if I can mix it with my earthenware clay, then I can do marbling and other such effects. I'm so stoked!

Of course, there's no guarantee that it will be compatible with my other clay, but I'll do the tests as soon as I can. And, there's the SMALL chance that it will be high-fire clay. Can you imagine!!

Oh, I can't wait to see what else this clay has in store for me!

Monday, June 7, 2010

Native Clay!

I am so excited! The kids and I decided to take a walk through the creek that runs through our small town (as in wading right in the water), and we went further than we've ever been. Turns out that just past the bend where we often stop to play, there's HUNDREDS of pounds of NATURAL CLAY - just waiting to be dug up and used!

It turns out that most everyone in town knew it was there but me :P And since most people don't yet know that I play in clay, no one thought to offer to tell me about it :)

Anyway, I called the woman who owns the property and she was more than happy to let me dig up all the clay I wanted. So I started out with about 80 or so lbs. of clay, as much as I could get home on the stroller, LOL!

The first step in testing native clay is drying it out and then crushing it to pieces/dust, then you add water to make a very thin slip, then sieve it through some mesh, and then you can dry it out, wedge it, and finally test it in the kiln.

So for now I have a bucket full drying, and put a couple slabs of wood out with some chunks to dry, which I've now crushed and am waiting to add the water when I have a chance to sieve it.

Here are some pictures that show how pure the clay is straight out of the creek. The clay is resting at the bottom of the creek bed, so there's no stones or sand even on top of it. Amazing! The wall is also clay, but will be harder to mine...


It's just so neat how you can see the layers so easily!

This past weekend was the first weekend at the local Wild Rose Renaissance Faire. The fist day wasn't too bad, beautiful weather and a record number of people, but only a few sales for myself. The second day was pretty bad attendance-wise. Only a handful of people braved the rain to come visit, and no sales that day. So I'm hoping for a better outcome the next two weekends.

Now I'm off to my garden to fix some plants that blew over in the bad wind (which also destroyed 5 vendors' tents at the faire...), and hopefully pick some strawberries!

Friday, May 21, 2010

Branching Out


It's that time of year again, sort of. The medieval faire has been moved to June this year so we aren't stuck dealing with snow and really cold temperatures.

However, I wasn't sure I even wanted to do it this year. I didn't work much on my ocarinas after Thanksgiving. Instead I delved into some Stoneware for the first time, making a bowl, mug, bird ocarina and bird water whistle for a friend of mine who lives in Australia.

So when January struck, I knew I only had 5 months before the faire, but my heart just wasn't into the clay. I had made a slight mistake with the stoneware pieces (let some colored porcelain dust settle into the pots right before the glaze firing), and my first-ever porcelain tests proved that the porcelain I bought and was so exited to use was only translucent at 1/16 in. thick, and with NO color in it.

On top of this, I think I had a case of SAD (seasonal affective disorder) and was in a major slump in general until about March when the sun came out a few times and I finally broke out my tools again.

I decided to try for round sound holes this time, and I switched glazes (from Spectrum, which shivered horribly, to Amaco which still works beautifully!) I also bought a high-fire blue-brown glaze that looks awesome.

In addition, I was commissioned by my midwife to make some vase-like containers for an event they were holding. So I made these:


I will definitely try making some more sculptural pieces relating to birth and pregnancy in my store, as many people made kind comments about them.

As I contemplated the direction I want my work to go, I realized two things.

ONE - that I want to experiment more. Ocarinas take so much time and I know in the end that they aren't perfect and won't sell on-line. For a medieval faire they are okay, but I don't want to spend all my time making them.

TWO - I want to work on two major themes in the near future. One being porcelain and translucency, the other being nature and parenting. I have an idea I'm developing that I hope pans out, as I would have a blast working on it.

And finally, after my disappointment with the current porcelain I have, I discovered Laguna's Frost porcelain. Apparently it's the same formula as Southern Ice for the most part, but pugged in California, so it's cheaper than the stuff imported from Australia. It is EXTREMELY translucent and white, and most of the pieces I see and like are made with Southern Ice. So I'm really hoping this porcelain will be all that I'm wanting in a translucent body - because I have also had an idea for a piece for YEARS but haven't found a way of making it.

So I am VERY excited!

Lastly, I made seven of my "faux leather" mugs, but decided to try using stoneware clay with a low-fire glaze. I heard the "pings" as soon as I started unloading them, and they haven't stopped since. So they are ruined. I now have nine more drying to re-fire with the high-fire glaze, and I'm really hoping they'll sell well at the faire, and hopefully even on Etsy.

So here's to trying new things, and to learning!