About Me

My photo
Jack of All Trades, Master of None. I have never met a hobby that I didn't fall in love with. But for now my focus lies mainly with pottery and with needle felting.

Thursday, March 23, 2017

It's Been Awhile, My Friend!

Well, it's hard to believe that almost SIX years have passed since I've last posted. While I wish I could say that I've become some big-shot in the birth art world and that I've made it big-time, instead I'll just say that it's been an interesting ride. Since my last post, I have began a new Etsy store featuring the sculptures and labyrinths that I was selling at the DONA conference in Boston. I've tried my hand at a few medieval faires with my ocarinas, mugs, and jewelry. I've delved into soap-making. And most recently, I've begun needle felting.


I absolutely LOVE needle felting! In some ways, it's like sculpting with clay, but it's also so very different. For starters, there's no waiting for something to be fired, and then glazing and waiting again. Once I finish a felting piece - it's DONE! And they are SOFT and CUDDLY! And it's easy to use colors and make things vibrant with fiber vs. clay. Though you CAN make colored clay, it's not the easiest process, and painting fine details on parts of sculptures isn't easy as you always tend to bump a part with a color that isn't supposed to be there.


You can see most of my journey on my Facebook page, https://www.facebook.com/Penleys.White.Oak.Creations/

I'll mostly be using this blog to do a few giveaways, though maybe I'll find the time to post every now and then :)

Monday, August 1, 2011

We Concord Boston!


And no, that wasn't a spelling error - if you pronounce "Concord" like a Bostonian, then you'll get the pun!

So two Thursdays ago I got up at 3:30 AM to start off for the "worst city to drive in" about an 8 hour drive without stops. Picked up two wonderful friends who were kind enough to go with me so I didn't get lost, didn't crash, and could sell my items with ease.

We made it to our hotel in Burlington without much problem. Burlington is only about 20 miles away from downtown Boston, where the DONA conference was. However, we couldn't check in until 3pm sharp, and by the time we freshened up a bit, it was already rush-hour traffic with cars baked up for miles.

What should have been a half hour's drive took us 1 and a half that first evening! Luckily for us, we ended up with a great spot at the show in part because of our lateness :)


Our "parking garage" that first night ended up being a back alley way where the guy parked the cars bumper to bumper and the fact that he kept our keys made one of my friends a tad n
ervous (turns out she doesn't like cities! - I'm so glad she was willing to go with me despite this!)
But all turned out well and we got set up and settled in. However, we knew there was no way we'd get to enjoy our free continental breakfast (eggs, Belgium waffles, etc.) the next two days since we'd need to leave before serving time in order to avoid the hour and a half drive into town again.

But day two went well. The figurines were well-loved, and I sold most of them that second day. After packing up, we enjoyed a dinner at the Cheesecake Factory at the Burlington Mall, after waiting half an hour for a table and then another hour before we were really eating. So we had half an hour to shop!

We hit up the bulk candy store for some lego-shaped candy, then I got a Shot Cake icecream cupcake, and had two minutes to shop in the LEGO store. Oh.My.Goodness. Lego heaven!! I so wanted to have time to look around, but alas, I ended up getting some keyshains for the boys and myself, and a deck of cards and some stickers. For the girls I picked up two fancy folding fans from a cute ethnic shop we perused while we waited for our table for dinner.
Much to our dismay, besides the mall closing at 9pm, our beloved hotel pool also closed by 9, due to a city ordinance, apparently. My two pregnant, tired friends REALLY missed the opportunity to go swimming.


But Saturday we still had to get up bright and early at 5AM for our last day in the harbor city. We did well in sales that day as well, and by the afternoon decided to take a tour of the city. We ended up wishing we had bought the tickets the day before as it turns out the tour was good for two days, and you could board and un-board as many times as you liked at any of 16 stops. It also included a free 45 minute boat ride and a museum admission, neither of which we had time for.

But we still enjoyed the tour of the city and got to see the first post office in the US, the balcony where the Declaration of Independence was read, and one of those city wading pools where little kids and adults alike were cooling off in the 108 degree weather.


But then it was back home, where we waited until we were off the toll road to eat because of the jacked-up prices. It was 10pm by then, so many places were closed for the evening. We were lucky to find a Pizza Hut open until 11, and then we got gas JUST before the place closed at midnight. Very fortunate for us, indeed!

I made it driving home until about 3:30 when I passed the wheel over, though I still stayed awak until we were home. By the time I pulled into my driveway, I'd been up for over 24 hours, and was quite exhausted!

But it was a great time, I made lots of new friends, and I really hope I can do it again!

While at the conference, I bought a little stuffed Lobster, whose tag says his name is, "Baby Rock." So I decided that he should accompany me on any trips I make with my ware, and when people ask me, "What's the Lobster for?" I'll reply, "I'm glad you asked....it all started in Boston!" At least it will be a conversation starter :)


So don't be surprised if you see photos of him in upcoming product pics!

Sunday, February 27, 2011

As Long As You Need Me...

Today, in the midst of being stressed about a messy house, spending money on supplies when I'm trying to MAKE money, and various other personal issues, I decided to finally make a piece which has been in heart my and on my mind for almost a year, now.
One of the biggest motivators for me to get into clay was my first daughter, Amber. For her first Father's Day present, we made Jim a gift of polymer clay handprints, and it was then that I realized I wanted to work in clay. It took a couple more years for me to realize it was ceramic clay instead of polymer clay, but that was the moment that spurred me to where I am now.

And she was a milestone for me in so many other ways, as well. She was not the calm, "happy" baby I had seen on TV or read about. She required either my hubby or me to carry her most of the day, bouncing and walking, and facing her outward. The rest of the time she nursed. I didn't know it at the time, but she led us into the idea of "Attachment Parenting".

Fast forward several years later, and as I sat in church one Sunday, my youngest daughter clung to me while the rest of her siblings, including her twin brother, left for Sunday School. For a second, I felt guilty, as if I was "spoiling" her (though I knew I wasn't, the feeling still crept in). But then as she wrapped her arms around me, I knew that being there for her in that moment was more important than trying to push her independence on her. I knew that for now, she just needed me to hold her - for a little bit longer. And I promised to her, and my other children, "I will hold you, for as long as you need me to."

And so this project is not just another sculpture to me. Like the pregnant couple, or the couple in labor, this piece has my heart all wrapped up in it. The words of my promise are inscribed on the bottom, and I hope they touch the heart of another mother who knows that this time with her children are short, and that holding them just a little longer if they need it, is something she will never regret.

I hope to make several pieces along this line - moments I've shared with my children, in time for Mother's Day. Here, then, is the first:


Sunday, February 20, 2011

Fare for the Faire

Today I had the privilege of opening the kiln after a high-firing. I haven't done as many of these due to the cost and length, so I'm always a little nervous as to the outcome...

Today it was a good opening :)

I was experimenting with some items to sell at the medieval faire in June this year, and here's the results!


Here are the dragon egg shakers after the smoke firing. I absolutely LOVE them! They have speckles, and swirls, and just some great contrasts on them.

And what goes better with dragon eggs than little dragons? These guys are adorable!

I hope to make several more of these by the time June rolls around.

And here are my skully mugs!

Another view of the back and handles.

Here are some castle mugs I made based on a recommendation from last year's faire.

In order to prevent dribbles through the gaps at the top of the castles,
I create spouts to funnel the liquid right to your mouth!

Wednesday, February 9, 2011

Eggs, Eggs, and More Eggs!


I ran out of my stoneware clay. I thought there was one more bag left, but it turned out to be my sculpture/raku clay instead. So with the little bit of smooth stoneware, I decided to delve into egg-making.

These are actually for the medieval faire. They aren't fired, yet, and I will be smoke-firing them for a blotchy/black/grey sort of look. Perfect for "Dragon Eggs"! As a bonus, they're actually shakers - or maracas.

If I find that enough people like the finished idea, I might try selling some on Etsy, as well. But for now I'm building up stock for the faire so I don't look at amateur-ish as I did last year!

Monday, January 24, 2011

Fresh From The Kiln

Just a quick update to let you all know what I've been up to. It's less than 5 months until the annual Wild Rose Renaissance Faire!! I know that sounds like a lot of time, but when you don't have much time, and you want to build up a lot of inventory, 5 months is almost nothing! I spent the fall creating inventory for my Etsy shop, and that turned out so well that now I am behind on creating new items to replace the ones I've sold.However, it's now time to focus on this medieval event, and so I have begun by brainstorming ideas and narrowing them down, and then mostly making molds for the pieces I want to create.

Here are a few pics, and just a hint at what you'll be seeing from me soon!


Here's some molds and some whistles (unpainted), and some pendant designs...


These are molds, or else molds for molds...in other words, the positive image I'll be creating a mold from. Lots of hard work, to be sure...


Some pellets for ??? You'll just have to wait and see!


These little guys need some pupils and some glaze, but they've already stolen my heart!

Sunday, January 2, 2011

Christmas Gifts & New Year's Items

I had a really great Christmas and New Year's this year. The kids were a little bit older, understood a little bit more, and no one got sick. So overall you can't ask for more!

I also enjoyed making a few items for relatives. One of which was a set of cute elephant m
ugs. The first mug I ever made when I got my first bag of clay along with the kiln from ebay, was an elephant mug. But I like it so much better when the clay was blank and grey than after I painted it in a safari look. So I decided to try again with a grey look, and this time go a little whimsical with a face. I made a girl and a boy elephant, which I liked quite a bit, though the girl was much taller than the lad!

I also decided to play around with my colored porcelain. I have been wanting to make some bowls with it, as well as play around with some slip. So I did both. The only thing I didn't like was that the bowls were FAR from round, as I couldn't slump them as round as I'd wa
nted. But otherwise I think they're quite charming. I will say, however, that I have to get used to how much the porcelain shrinks. The bowls were MUCH larger before drying and firing!

Last were some family trees for the grandparents. The coloring was a tad too dark, so I got some glass enamel paint to use to try to bring out the type more. They both loved them, but I will make the rest with the lighter brown color...


And for the new year, I decided to make some Arkan Sonneys.


Friday, December 24, 2010

Fatal Attractions

I guess it was bound to happen sometime...well, maybe not. But it will guarantee it never happens again.

I'm not sure if it was coincidence, or a direct result of, or just a bad omen. But last night while firing the kiln, we heard something ceramic fall to the floor. My hubby asked if something blew up in the kiln if we would hear it. I replied that Yes, we would, but it would be more of a "pop" sound WITHIN the kiln, not something dropping to the floor.

Turns out it was just one of the peep-hole plugs. So I stuck it back in, and felt very relieved, mostly. But part of me was still a tad worried about things....

Last evening we were watching a show on television called "Fatal Attractions". It featured various people who fell in love with wild large cats, such as lions or tigers, and kept them as pets, and eventually the cat either killed them, someone else, or had to be put down due to its wild nature not fitting in with the context it was living in. In many of the cases, the owner of the animal made just one mistake...but that mistake was all it took for a devastating outcome.

Turns out I was playing with fire as well. Lately I've been pushing the limits as to how thick things are that I make and decide not to carve out. I've heard an inch is a good rule of thumb. So the other night, I made about 10 little creatures about an inch thick that I planned on firing the next day if I could get them dry enough. (Mistake number one....) My daughter also happened to make a thick Christmas tree, which I really SHOULD have carved out, but due to the fact that I was very tired (I stayed up late for other last minute projects), and I had fired other stuff some-what thick, I took a risk.

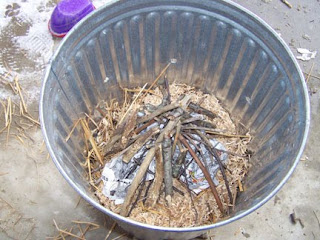
It's a risk I'll never take again. I woke up, opened up the kiln, and discovered some wayward pieces of bisque-looking chunks on the top shelve where I had my glazed objects. I could figure out where they came from until I glanced down to the bottom of the kiln and saw several more fragments scattered about, and then it hit me - I finally crossed the line and blew something (or things) up in my kiln.

The tree didn't survive, nor did 4 out of my 10 little creatures. On top of that, a Christmas gift I intended didn't quite turn out as I had hoped, so I'll have to think of a way to fix that, as well.

Overall, I know it's not a huge deal. But it could have been prevented. How many times have I mentioned that you must carve out your clay? How many times have I carved out something I didn't want to because I was tired and ready to be done with clay for the day? And yet here I am. I took a chance, and I learned my lesson. No more playing with the limits in this regard again...

Monday, December 13, 2010

New Items For Sale!

I did a high-firing this weekend, with some Christmas gifts and a few Etsy items. I also did a bisque/glaze firing and experimented with some pendants. They aren't real fancy, yet, but it's a step in trying something new.

Here is the couple I was working on...I really do love this one - just like the couple in labor that I did. It's not real detailed or anything, but the FEELING really comes across for me.

I'm excited that I've gotten a few sales this month due to the holiday season. It does wonders to boost my self-esteem and urge me on to try new things, make mistakes, and get my hands dirty! I never truly give up hope, but there have been days, this past year especially, that I am too fearful to make anything at all, simply because I might fail. But with each sale, I have a source of energy and encouragement that overcomes those dark, negative thoughts. And for this, I am thankful. Even more so than for the money. The money helps pay for my clay. The affirmation keeps my drive well and thriving.

Friday, December 3, 2010

Sneak Peak!


My latest creation in the works...

What goes into a Smoke Firing?

I've been working this week on some sculptures that I intended to smoke fire, so I figured I'd show you what exactly goes into a smoke firing that makes it so special...
The first step after creating the piece is to burnish it. There are many different ways to do this, but I use a smooth rock that I found in the local creek, and burnish the clay just before it is dry, but after it is leatherhard. Here is an example of a burnished piece compared to a yet-to-be burnished piece. You can see the visible shine and smoothness of the piece on the left:

After they are fired to a low bisque temperature (cone 010 because it's what the pottery supply store had on hand in cones), I take them outdoors for the REAL fun!This time I decided to try my new trash can which I've punched holes into. Usually I use old popcorn or Christmas tins that are much smaller, but since I have five items and I DID take the time to punch all the holes in the trash can, I'll try something new.


In this case I've taken straw, salt, baking soda, coffee grounds, and miracle grow (hopefully for color) and placed it in the bottom of the can, then the pieces I'll be firing, and then more straw with colorants. Then I light it on fire, and shortly thereafter I smother it.
.

It smokes for a while, but not very long. I need to learn how to get better results in color by letting it burn longer, but I never seen to be able to control what the fire does or how much it colors the pieces.

After it cools down, I remove the lid, and there are my pieces! Already you can see the variants of color the smoke has left.


After I scrub the ashes and char off the sculptures, I lightly buff them with some bee's wax/olive oil mix, to help bring out the color a bit more.


This type of firing method is very similar to how the ancients fired their pots and art, and I hope to keep experimenting with it!

Friday, November 26, 2010

Holiday Sale!

Holiday Sale!

Before I get to the (hopefully) resolution of my element dilemma, I wanted to share that from Black Friday through Cyber Monday, you can get 10% off anything in my Etsy shop! Just use the coupon code Turkey10 during checkout!

Okay, on to business. So in lieu of spending $60 per element, when I know that my other elements will probably be failing soon, as well, my wonderful (and handy) hubby and I learned how to heat, twist, and connect pieces of my existing elements together to create a (for now) working element. It took a few hours longer than I had wanted, but in the end, if it saves me $240 for a little while, then it'll work for now.

Eventually (maybe in the summer?) I'd like to convert the kiln to gas, which will not only save money in the long haul, but will allow for experiments in reduction firing, raku, and possibly soda/salt firings.

I also have narrowed down some ideas for both my shop, as well as the medieval faire, so now all I need is some free time - HA!

Always Something New


EDIT: This post was originally meant to go up November 7...however, I accidently posted it on my personal blog instead. So here it is, albeit a bit late.


I know it's been awhile, AGAIN, since I last blogged. But for the sake of excuses, I'd rather have something TO blog about, than to chat on about nothing in particular.

I promised pictures of my next idea - I've got something even better - the finished product! Here are some recent pieces I'll be adding to Etsy soon:


These are two pregnant women in yoga-like poses, gazing down at their blossoming bellies.


Another two pregnant bellies, this time with just the torso and a hint of appendixes. Both glazed, one clear, the other a Blue Rutile, though I was disappointed that no blue showed up.


Two more bellies with carved designs and smoke fired. The profile of the tree of life one is below:

This is an idea I'd like to expand on - women in labor.


And here are some necklaces that I played around with:


The mothers above are my original designs of attachment parenting concepts.
And lastly, I promise to try to get past my fear of screwing up and start getting my hands messy more often. I have a ton of ideas brewing in my head, none of which are even remotely close to the ideas in this post. Some are great for the ren faire, and some I'm hoping are great for anytime. But the point is, I won't know until I try. So try, I will.

This last picture is of my colored porcelain (mixed with mason stains) soaking in water to become slip. I really want to try sgraffito and other slip methods with these. So here's to not giving up. See you very soon!

Monday, November 15, 2010

It's Elements, My Dear Watson...

So that time has come. The moment I've heard about, read about, feared about. An element has failed me, finally.

I noticed it when I tried to turn on my kiln for the last firing, and did not hear the normal "humming" sound that indicates the elements are warming up. So I flipped the switch back and forth a couple times, tried the other switches, which DID hum, and finally gave up and fired without my lowest element. Luckily it was just a bisque firing so I knew it would reach temp okay, as long as no other elements decided to kick the bucket, as well.

So today I got brave and decided to make sure it was the element, and not the switch, by checking the continuance of the element with an ohmmeter. It was definitely the element. Checked online for prices for a replacement, and even considered buying enough to replace all of them at the same time. HA! $60 a pop, at 4 elements...almost as much as I paid for the kiln originally.

So, I did the next best thing, and decided to take out the element of the extension for my kiln, which I've never used, yet, and save myself money for the time being. But a stubborn, rusty screw, and one last snap of the wire, and now I have a too-short element. I tried warming it to twist it with another piece, but keep breaking it, instead. So I'm waiting until my hubby can take a gander at it and make it (hopefully) work. I'll also see about splicing some of my other elements as there is at least one other very dark spot that is likely to go bad soon, as well.

It's days like these that I wish I had fallen in love with a much less expensive hobby.

Tuesday, July 6, 2010

The Mother-Load

A few weeks ago I took my second expedition down the creek to the location of the clay. I had my parents there to help me carry back another 100 lbs. of clay, which still wasn't easy despite the wagon we used to cart the goods home. At some point in the future I will ask the landowner opposite the clay if we can drive closer to the actual point of the site so that we don't have to carry it several feet through the creek and then up the bank...Anyway, I took pictures to demonstrate how this particular clay looks in a creek and then the large deposit I'm actually mining. Plus some pics of the kids and grandpa swimming ;)First is a glimpse of what I noticed that first day - the small white "stone" in the creek. Notice that initially there's nothing that shouts out "CLAY!"


Next you'll notice a larger chunk of clay, and then a very large streak on the creek bottom. We're getting closer!


And here's the Mother-Load!!! You can see in the creek bank where the clay ends, both on land and in the water.


Here is a second spot just a few feet up stream from the first. You can see how it has been either dug out by other people (some used it for horseshoe pits, others for firing, some for "war paint", etc.) or else the creek is actually carrying it away. I hope it's the former - I'd hate to see all this disappear.


Some fun while we're at it :)


Here's what appears to be a small piece of clay, but once it's dug out of the creek, you'll see that it was just a hidden "iceberg" poking out.

So there you have it - Finding Your Own Native Clay 1o1!

Next time I post I'll have pics of my newest ideas - if I ever find time to work on them! Between vacations, cooling off in the water and visiting with friends, it's hard to actually find time to sit down and create. But I have a ton of ideas I'm dying to toy around with!